22. Adding to the database with Django Admin
The question now arises about how we might populate our new database with data.
We could log into PostgreSQL and we could issue countless SQL commands to populate the various tables. But often in many web applications, users provide the data and the data enters via the website.
For other applications, we might have larger precompiled datasets, such as lists of postcodes and addresses, phonebooks, product catalogues, etc and certainly when we are developing an application, we might want nothing more than just to insert a small amount of data into our applications that we can test out our development.
Those are two the main ways that you might go about populating your database, and probably the main one for larger dataset is to write a script that will update the database.
But Django also provides a useful administration interface that we can use to examine the contents of the database and add and edit there too.
In order to use that, we’ll need to add an administrative user to our project.
So in CMD, in the directory with manage.py:
(env) $ python manage.py createsuperuser
We will be asked username, email address, password (twice) – by convention you can use admin and a normal password. Once all done this will return “Superuser created successfully.”
You may need to go to settings.py now and add your host into ALLOWED HOSTS if you are running from a remote host.
We can now start the server
(env) $ python manage.py runserver
We can now go to http://127.0.0.1:8000/admin/ and log in to Django Admin using the new username and password created.
Now go to admin.py in VSC which is in the genedata directory.
We firstly need to import all the models that we have previously written.
from .models import *
We need to create classes which create a tuple which defines the different columns that we’ve already defined.
class GeneAdmin(admin.ModelAdmin):
    list_display = ('gene_id', 'entity', 'start', 'stop', 'sense')
That configures what we’re going to show in the administrative interface, but then we need to actually use it in the administrative interface and to do this we have to register each model we want to share.
admin.site.register(Gene, GeneAdmin)
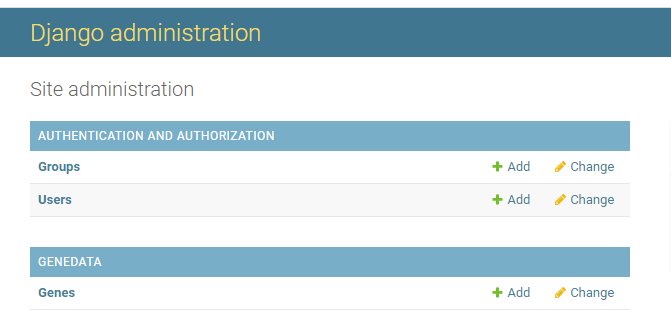
Save this and then go back to http://127.0.0.1:8000/admin/ You should already see groups and users. If you hit refresh, Genes should now appear too.
You can now click on Add to add some data.
In the example we weren’t able to add Sequencing and Ec as there we no options. So we went back to admin.py and added:
class ECAdmin(admin.ModelAdmin):
    list_display = ('ec_name', )

class SequencingAdmin(admin.ModelAdmin):
    list_display = ('sequencing_factory', 'factory_location')

admin.site.register(EC, ECAdmin)
admin.site.register(Sequencing, SequencingAdmin)
The server will actually restart every time we save a file. The CMD window should confirm this.
So let’s go back to http://127.0.0.1:8000/admin/genedata/gene/add/ In the left-hand column we should see Ecs, Genes and Sequencings listed under GENEDATA.
We can add an ec name, eg oxidoreductase, and a sequencing name, eg Sanger, UK, saving both of these.
Now we can try again and add a gene.
We can go back to admin.py and add products and attributes too:
class ProductAdmin(admin.ModelAdmin):
    list_display = ('type', 'product')

class AttributeAdmin(admin.ModelAdmin):
    list_display = ('key', 'value')

admin.site.register(Product, ProductAdmin)
admin.site.register(Attribute, AttributeAdmin)
We can also include the link table too – this goes at the start of all the classes:
class GeneAttributeLinkInline(admin.TabularInline):
    model = GeneAttributeLink
    extra = 3
And add this in the gene class:
inlines = [GeneAttributeLinkInline]
Here’s the complete code for the page:
from django.contrib import admin
from .models import *

class GeneAttributeLinkInline(admin.TabularInline):
    model = GeneAttributeLink
    extra = 3

class GeneAdmin(admin.ModelAdmin):
    list_display = ('gene_id', 'entity', 'start', 'stop', 'sense')
    inlines = [GeneAttributeLinkInline]

class ECAdmin(admin.ModelAdmin):
    list_display = ('ec_name', )

class SequencingAdmin(admin.ModelAdmin):
    list_display = ('sequencing_factory', 'factory_location')

admin.site.register(Gene, GeneAdmin)
admin.site.register(EC, ECAdmin)
admin.site.register(Sequencing, SequencingAdmin)
Wednesday 3 November 2021, 520 views
Next post: 23. Adding to the database by writing a script Previous post: 21. Migrations
Advanced Web Development index
- 38. Writing API tests
- 37. Testing in Django
- 36. Class-based views in the Django REST framework
- 35. Building a RESTful web service in Django
- 34. Introduction to CRUD, REST and APIs
- 33. Refactoring with generic views in Django
- 32. Django validators
- 31. Django forms (2) – using the ModelForm class
- 30. Django forms (1)
- 29. JavaScript basics
- 28. Adding CSS to the template
- 27. Django templating
- 26. Deleting and updating records
- 25. Joins, filters and chaining commands
- 24. Using the ORM in views.py
- 23. Adding to the database by writing a script
- 22. Adding to the database with Django Admin
- 21. Migrations
- 20. ORM – work through example
- 19. An introduction to the Object-Relational Mapper
- 18. Altering the database
- 17. SQL functions and summaries
- 16. SQL Query performance
- 15. Queries and table joins in SQL
- 14. Inserts and queries in SQL
- 13. Good practice in relational database design
- 12. Limitations to database modelling
- 11. Building a database using SQL
- 10. Introduction to PostgreSQL
- 9. How to start writing a new application in Django
- 8. Building a lightweight project
- 7. Django URLs
- 6. Django templates
- 5. Django models
- 4. Django views
- 3. Creating a new hello app
- 2. Creating a new virtual environment
- 1. Setting up Django


Leave a Reply