28. Adding CSS to the template
28.01 Creating a stylesheet
We can create a CSS sheet and the best place to put this is in a new folder called static (for our static assets) and a subfolder called css. We can then give it a name, eg genedata.css.
In our header.html we can now add this:
<link rel="stylesheet" type="text/css" href="../static/css/genedata.css">
We can now also set up a stylesheet. I won’t explain this in detail but here it is:
genedata.css

body {
    font-family: Sans-Serif;
    margin: 0px;
    border: 0px;
    padding: 0px;
   }
   #application_title
   {
    display: inline;
   }
   #logo{
    height: 50px;
    width: 50px
   }
   #header{
    width: 100%;
    background-color: #3caea3;
   }
   #navigation{
    width: 100%;
    background-color: #20639b;
    color: #ffffff;
    padding: 2px;
   }
   #footer{
    width: 100%;
    background-color: #92cdc7;
   }
   #application_title
   {
    display: inline;
    vertical-align: middle;
   }
   #logo{
    vertical-align: middle;
    height: 50px;
    width: 50px
   }
   #header{
    vertical-align: middle;
    width: 100%;
    background-color: #3caea3;
   }
   a {
    text-decoration: none;
   }
   .nav_link {
    color: white;
   }
   #content{
    padding-left: 10px;
   }
In index.html we can add our application_title element
<h1 id="application_title">D.Bucha Genes</h1>
and in our logo similarly we can add id=”logo” – this is in title.html:
<img src="https://upload.wikimedia.org/wikipedia/commons/e/e0/202002_Laboratory_instrument_dna.svg" alt="dna logo" id="logo" width="50px" height="50px">
Also in title.html we can add a bit more navigation too:
    <div id="navigation">
        <a class="nav_link" href="/">Home</a>
        <a class="nav_link" href="https://www.ebi.ac.uk/">EBI</a>
        <a class="nav_link" href="https://www.uniprot.org/">Uniprot</a>
    </div>
28.02 Restyling the website
We are going to create a side menu for every page with the list of genes on it.
First we go back to views.py and in the index function we change the name to master_genes:
def index(request):
    master_genes = Gene.objects.all()
    return render(request, 'genedata/index.html', {'master_genes': genes})
If we want the navigation to appear on every page, then we need to run this query, and we need to pass that data in the context object.
So scroll down to the gene function and add
master_genes = Gene.objects.all()
before we return render, and then add to the context object here
{'gene': gene, 'master_genes': master_genes})
The function now looks like this:
def gene(request, pk):
    gene = Gene.objects.get(pk=pk)
    gene.access += 1
    print("Gene record:", pk, "access count:", str(gene.access))
    gene.save()
    master_genes = Gene.objects.all()
    return render(request, 'genedata/gene.html', {'gene': gene, 'master_genes': master_genes})
Do the same with the list function:
def list(request, type):
    genes = Gene.objects.filter(entity__exact=type)
    master_genes = Gene.objects.all()
    return render(request, 'genedata/list.html', {'genes': genes, 'type': type, 'master_genes': master_genes})
And lastly, the poslist function:
index.html no longer receives a variable called genes -0 it’s now called master_genes. So change this too in index.html:
{% for gene in master_genes %}
However we actually want this section
    <h1 id="application_title">D.Bucha Genes</h1>
    <table>
    <tr><th>Gene ID</th></tr>
    {% for gene in master_genes %}
    <tr><td><a href="/gene/{{gene.pk}}" >{{gene}}</a></td></tr>
    {% endfor %}
    </table>
to live on the left hand side of the page. So we can cut this out of index.html and paste into base.html, surrounding it with some new div tags and then surrounding with content block tags, like this:
{% block geneList %}
    <div id="gene_list">
    <h1 id="application_title">D.Bucha Genes</h1>
    <table>
    <tr><th>Gene ID</th></tr>
    {% for gene in master_genes %}
    <tr><td><a href="/gene/{{gene.pk}}" >{{gene}}</a></td></tr>
    {% endfor %}
    </table>
    </div>
{% endblock %}
Finally we need to change the stylesheet to create a float so that the gene list and contents float beside each other. These are the css changes we need to make:
#content{
 padding-left: 10px;
 float: left;
}
#gene_list{
 padding-left: 10px;
 padding-right: 20px;
 float: left;
 border-right: 2px dashed black;
}
#footer{
 padding-left: 10px;
 width: 100%;
 float: left;
}
Okay, it’s not super smart, but it works:
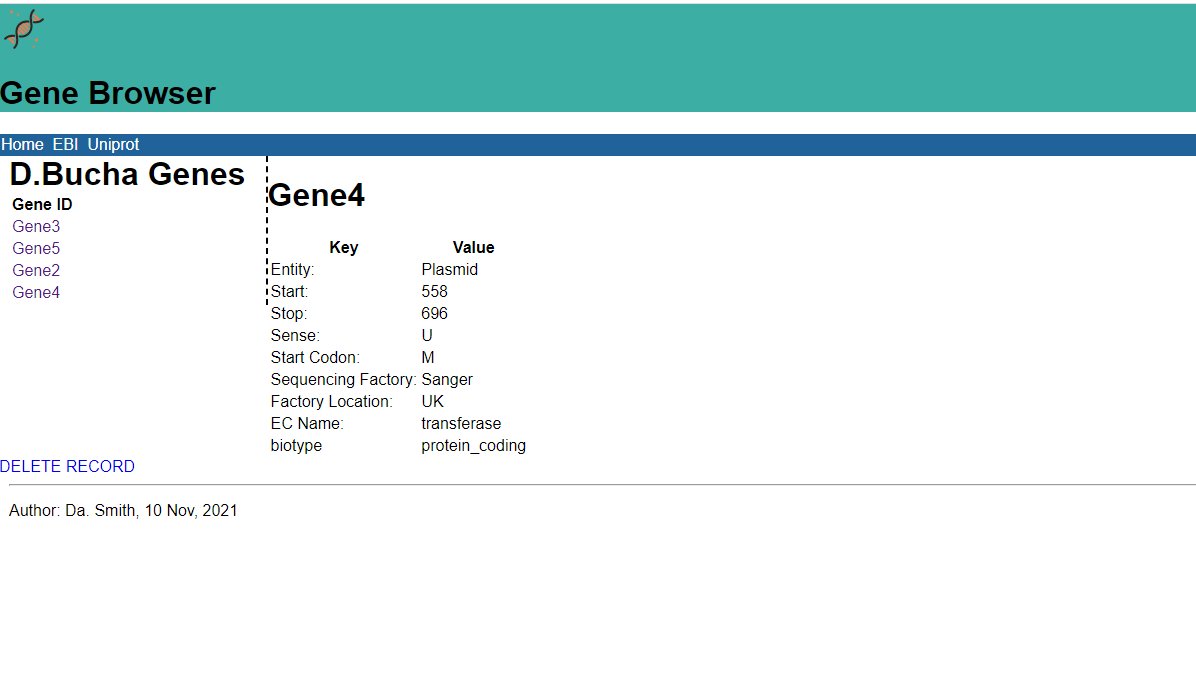
Wednesday 10 November 2021, 532 views
Next post: 29. JavaScript basics Previous post: 27. Django templating
Advanced Web Development index
- 38. Writing API tests
- 37. Testing in Django
- 36. Class-based views in the Django REST framework
- 35. Building a RESTful web service in Django
- 34. Introduction to CRUD, REST and APIs
- 33. Refactoring with generic views in Django
- 32. Django validators
- 31. Django forms (2) – using the ModelForm class
- 30. Django forms (1)
- 29. JavaScript basics
- 28. Adding CSS to the template
- 27. Django templating
- 26. Deleting and updating records
- 25. Joins, filters and chaining commands
- 24. Using the ORM in views.py
- 23. Adding to the database by writing a script
- 22. Adding to the database with Django Admin
- 21. Migrations
- 20. ORM – work through example
- 19. An introduction to the Object-Relational Mapper
- 18. Altering the database
- 17. SQL functions and summaries
- 16. SQL Query performance
- 15. Queries and table joins in SQL
- 14. Inserts and queries in SQL
- 13. Good practice in relational database design
- 12. Limitations to database modelling
- 11. Building a database using SQL
- 10. Introduction to PostgreSQL
- 9. How to start writing a new application in Django
- 8. Building a lightweight project
- 7. Django URLs
- 6. Django templates
- 5. Django models
- 4. Django views
- 3. Creating a new hello app
- 2. Creating a new virtual environment
- 1. Setting up Django
Leave a Reply